What is Azure Lab Service?
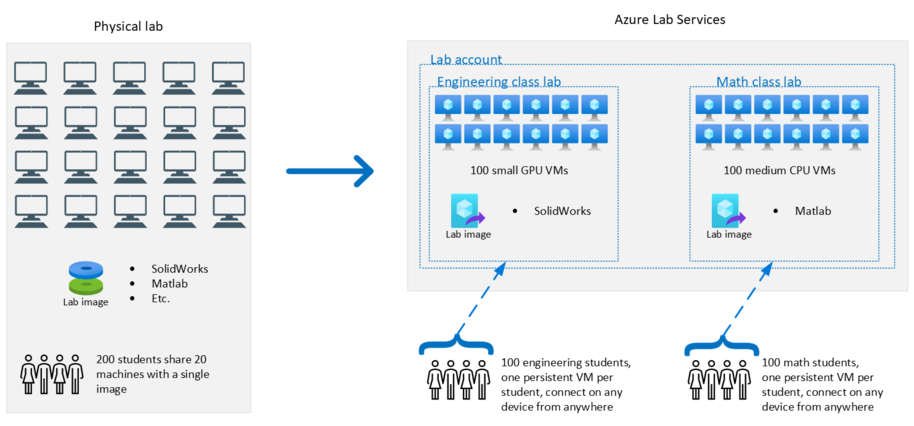
Azure Lab services is a managed service for quick and easy provisioning and tearing down virtual machines (VMs). Lab services can be used for running hackathons, teaching a class, training professionals and hands-on labs.
We have started using Azure Lab Services for two different courses at our university. One of the courses needed GPU-enabled virtual machines and the second course needed normal virtual machines able to run Docker apps. Below is the summary of the second course requirements and how we met their needs.
Note: I will not provide details about each step in creating the lab environment because official Azure documentation already has great guides which you can follow here. I will share our experience of working with Lab Services to help you evaluate the service.
Scenario
There was a need for an environment in a software development course to do software testing assignments.
Challenge
Students often get stuck with tooling problems that can take way too much time to solve, which does not contribute to learning goals. A solution where we can provide a prepackaged environment for students, to get straight to the learning tasks was needed.
Requirements
- Students needed on-demand access to the VMs
- Teacher assistant might need to access student VMs for grading the assignments
- The environment configuration and software packages should be identical for all students
- Cost effective solution with automatic shutdown options
- No need to manage storage, Networking, and administration of VMs
- There were some hardware requirements for each VM to run the apps properly (minimum CPU cores and RAM)
Solution
In an Azure subscription for this course, we created an Azure Lab account. It is possible to create several labs under one lab account.
First, you might need to check the number of cores available for your lab account. There is a possibility of requesting an increase in the number of cores from the overview tab in the lab account.
If you need to give access to the teacher or teacher assistants, you can use Access Control (IAM) tab. To follow the least privileged access policy, we gave Contributor role to one of the teacher assistants on the scope of lab account service. Please note that, to assign roles, you need to have User Access Administrator role.
To create a new lab in the lab account, you will be redirected to the lab portal. In the lab portal, you can create a new lab. A new lab needs a name, an image for the operating system and you also need to choose the size of the VMs.
There is a list of available images on Azure for different Linux distributions and Windows VMs. It is also possible to create your own image beforehand and use your own images.
The size of the virtual machine depends on your requirements. What is supposed to be run on virtual machines will be the deciding factor. You cannot change the size of the VMs later, so you need to have a good estimate of the CPU cores and RAM you need. There are also options for GPU computing.
If you need to run Docker on Windows virtual machines, make sure to choose nested virtualization option.
Results
The course started in September 2021 and ended in December 2021. The teacher estimated a maximum of 50 students registering for the course.
First, we created a lab using Windows 10 image with nested virtualization. We choose a size (4 cores and 16 GB RAM) to exceed the hardware requirements. Hopefully, in future, it will be possible to change the size of the virtual machines after creating the lab.
Then we gave access to the teacher assistant to manage the lab and template VM. He had to connect to the template VM several times to install and configure all the necessary environment for the assignment. After testing the template and making sure the environment was ideal, we provisioned 50 virtual machines based on the template.
If you need to make changes to the virtual machines, you need to change the template VM and publish the changes to the VM pool. Publishing the template will erase all the previous changes on VMs. Therefore, make sure to not publish any changes after the students start working with VMs. Otherwise, their progress will be lost.
Students can be invited to use the lab with their email address. Once they are registering to use the lab, you will see the status in the lab portal. In our case, 44 students were invited, and 36 students registered for the lab. You can follow the usage of each student from the lab portal and adjust their quota if they need more time to use the virtual machines.
Stats
- 36 registered students
- 8 unregistered students (did not use any VM)
- Hourly cost of each VM: $ 0.55/hour
- Total hours used (by students): 577.5
- Total cost: € 312.05
Feedback from teacher and teacher assistant
The overall feedback was positive, and the solution met the needs for an easy and quick way to setup environments for students to focus on their assignments. They will use the same solution for future courses.
There were some reported issues with input latency as students had to type frequently inside the virtual machines and the experience was degraded because of the latency. This will be investigated further, but our guess is network latency between Azure and location of our students.
We will continue using Azure Lab services in future courses in similar scenarios. The amount of effort that Lab Services requires is minimum and the costs associated with this managed service are justified.


