
I have been investigating the use of Bicep for deploying Azure virtual machines (VM) for my projects. My customers have different requirements for their virtual machine configurations. I tried to create a flexible Bicep template which can be used for various scenarios.
I assume the readers are already familiar with concepts such as infrastructure as code (IaC) and declarative approach. If you are looking for a place to learn Bicep with hands-on exercises, I suggest Microsoft Learn modules for Bicep.
General requirements
The template creates a virtual machine along with other necessary resources which includes a network interface, network security group, virtual network, public IP address and OS (Operating Systems) disk. It also provides network security group (NSG) rules as parameters to configure the network restrictions at deployment time.
Additionally, it installs Azure AD SSH Login (AADSSHLogin) extension on the virtual machine after deployment. We usually use Azure AD to login to virtual machines using our current organization account credentials.
The template is created in a way that the user can select the operating system (Windows or Linux/Ubuntu). Instead of having one separate template for each OS, I decided to add more flexibility to a more general template.
Parameters
When deploying the virtual machine using this template, you will be prompted to enter values for a few parameters. Those parameters are VM name, choice of the OS (Windows or Linux), OS SKU, admin username, authentication type (password or SSH public key) and admin password/ssh-key.
Other parameters which you should check and modify based on your needs are in the parameters file.
Template code
Complete files for this project can be found on GitHub. The directory has three files.
- The “vm.bicep” file is the template file. Resources are defined in this file.
- The “vm.parameters.json” file. This is the parameters file which can be modified for each deployment.
- The “README.md” file. Explains how to use the template.
Deployment steps
- Prepare the parameters for your deployment.
- Then, you need to create a resource group from Azure portal.
- Use the command below for deployment:
- Use the name of the resource group in the below command.
- Please note that virtual machine resources will be created in the same region/location as the resource group.
- The “DEPLOYMENT-NAME” you provide below will be the name you will see on Azure portal (RG -> Settings -> Deployments)
$ az deployment group create --name DEPLOYMENT-NAME --resource-group RESOURC-GROUP-NAME --template-file vm.bicep --parameters vm.parameters.json
- Enter the values for prompted parameters.
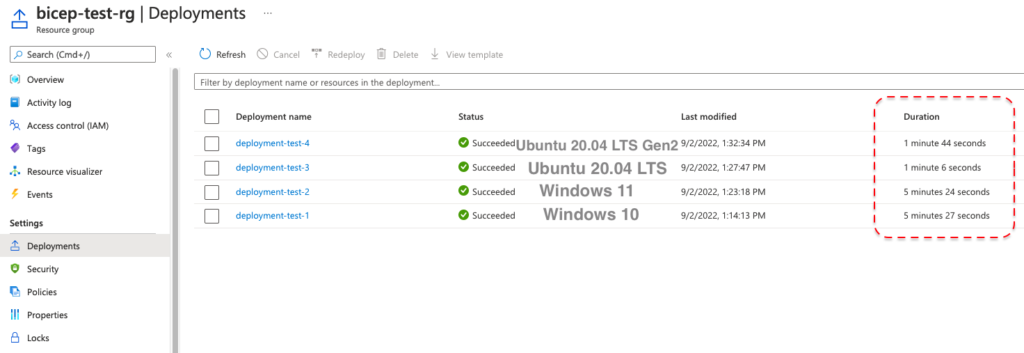
Depending on your choice of operating system and other parameters, the deployment can take roughly 1-5 minutes to complete. If the deployment is successful, you will receive a succeeded message. Follow the status of your deployment from Azure portal -> target resource group -> settings -> Deployments.
The image below shows the duration of deployment for each of the OS SKUs (Windows Desktop 10 and 11, Ubuntu 20.04 LTS and 20.04 LTS Gen2).
Notes:
- For Linux virtual machines, we recommend using AD Login. To give access to virtual machine using Azure AD login, you need to add a new role on the resource group level. Instructions for adding the role can be found here.
- Clients then can connect using this command:
$ az ssh vm -g RESOURCE_GROUP_NAME -n VM_NAME
- Clients then can connect using this command:
- For Windows virtual machines, password authentication works fine. If you want to use Azure AD login, some requirements should be met from the client side. Remote connection to VMs that are joined to Azure AD is allowed only from Windows 10 or later PCs that are Azure AD registered (starting with Windows 10 20H1), Azure AD joined, or hybrid Azure AD joined to the same directory as the VM. Read more here.
Ideas for improvement
- Adding the ‘Virtual Machine Administrator Login’ role inside Bicep template. Currently, this is a manual step.
- Create Bicep Modules for different resources.