
Microsoft Azure has some built-in roles which can be used to give permissions to users, groups, or service principals. However, if we want to go with the principle of least privileged and only grant access that users need, we might need to create custom roles in some cases.
In this tutorial, I will show how to create an Azure custom role with an example. The example is a real-world scenario in my organization, where the user only needs permissions to start, restart and deallocate the VM (Virtual Machine). In addition, the user might also need to see (read) the public IP and network interface of the VM.
Requirement
The cloud admin needs permission to create custom roles which is granted to Owner or User Access Administrator role in the scope in which the custom role is being created. User Access Administrator role lets you manage user access to Azure resources.
Create a custom role using Azure Portal
Login to Azure portal and follow the steps below:
- Choose the scope that you want to create the role. For example, subscription, resource group or a management group (at the time of writing in preview only). For virtual machines in a resource group, I recommend assigning the role on the level of resource group or higher. If the role is on level of resource itself, there might be some complications as some other resources related to virtual machines, like the public IP address or virtual network are not in the scope of the new role.
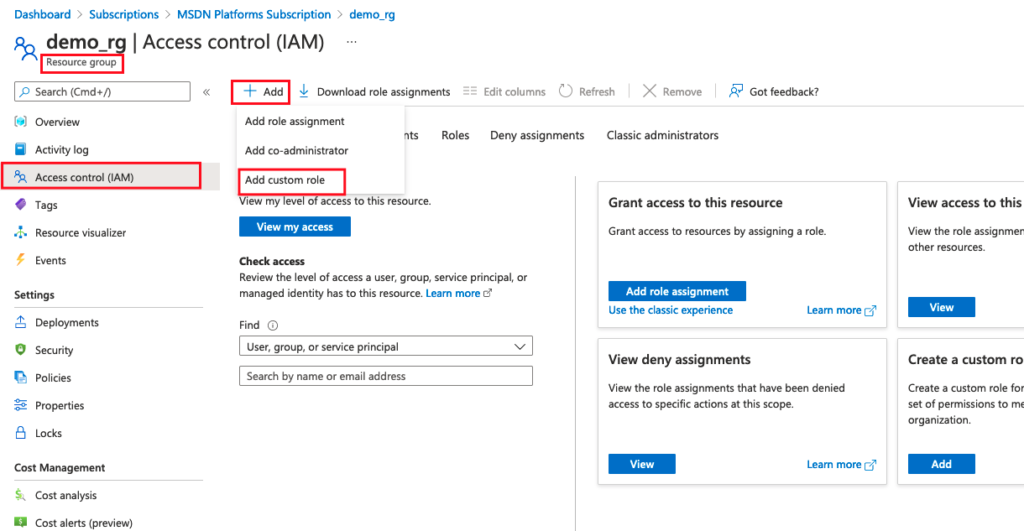
- Inside the resource group, open Access Control (IAM).
- Then click +Add and choose Add custom role. Create a custom role editor will open.
Add custom role information and permissions (for more details refer to Azure docs)
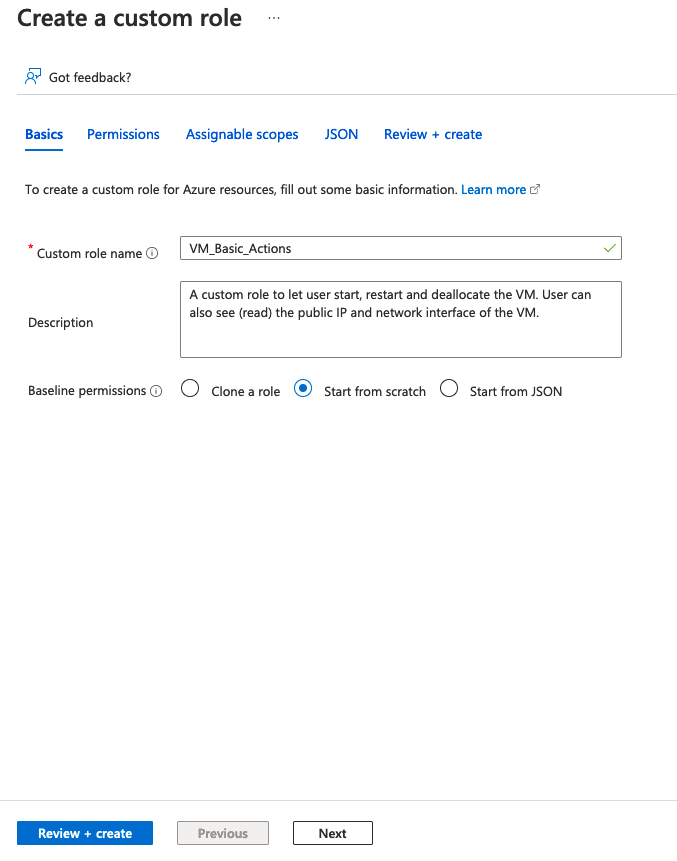
- In the editor, in Basics tab, write down a name and description for this new custom role. For baseline permissions, select Start from Scratch.
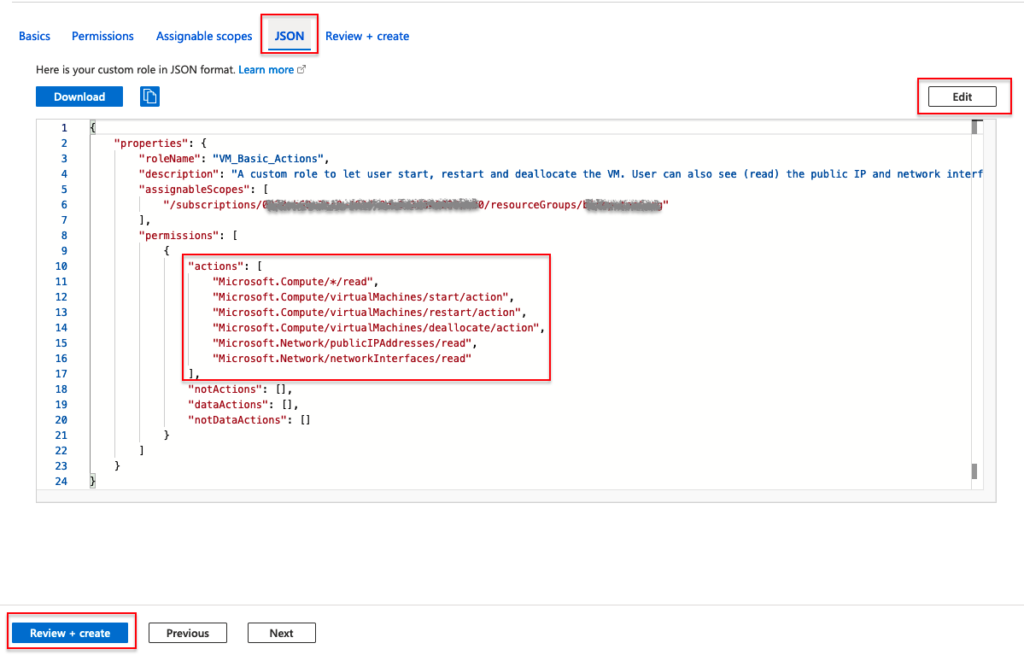
- You can add permissions whether from Permissions tab or use the JSON tab for adding a JSON format definition of the permissions. In this tutorial, since we know the permissions that we need, we will use the JSON tab. However, it is useful to use Permissions tab to explore available permissions. Click Edit on the top-right corner of JSON tab to edit the JSON.
- For our simple custom role to do basic actions on virtual machine, we only have Actions we want the user to perform. Copy the actions from code snippet below.
{
    "properties": {
        "roleName": "VM_Basic_Actions",
        "description": "A custom role to let user start, restart and deallocate the VM. User can also see (read) the public IP and network interface of the VM.",
        "assignableScopes": [
            "/subscriptions/$SUBSCRIPTION-ID/resourceGroups/$RESOURCE-GROUP-Name"
        ],
        "permissions": [
            {
                "actions": [
                    "Microsoft.Compute/*/read",
                    "Microsoft.Compute/virtualMachines/start/action",
                    "Microsoft.Compute/virtualMachines/restart/action",
                    "Microsoft.Compute/virtualMachines/deallocate/action",
                    "Microsoft.Network/publicIPAddresses/read",
                    "Microsoft.Network/networkInterfaces/read"
                ],
                "notActions": [],
                "dataActions": [],
                "notDataActions": []
            }
        ]
    }
}
- Make sure to keep the assignaleScopes to the right scope you selected before and do not paste that line from the template.
- Click Save, review, and make sure the scope is correct. Then create the custom role.
New custom role assignment
To assign the newly created role to a new user, follow these steps:
- In the resource group → Access Control (IAM) → Add → Add role assignment
- In the roles tab, find the newly created custom role and click next.
- In Members tab, click “+ Select members” and choose the users you want to assign this role.
- Then click review and assign.
Please note that role assignment sometime takes time and is not immediate.
Create a custom role using ARM Bicep templates
If you want to create this custom role using a Bicep template, I created a template with instructions on GitHub.
Going forward to create other custom roles
Now that you are familiar with creating custom roles, you should be able to create a role for your own use case. You can follow the same instructions outlined in this post to create new roles. You would need to replace the actions, change name and description of the role, find out where is the target scope for new roles. It is better to create the roles on higher level scopes to share the newly created custom roles among multiple subscriptions or resource groups.
Resources
Please refer to the main Azure documentation for creating custom roles in detail.